반응형
Ex12EditText
안드로이드 네이티브 앱 개발 수업 예제#12
주요코드
EditText의 여러 속성과 기법 알아보기
- res폴더>>layout폴더안에 있는 activity_main.xml문서를 수정하여 화면제작
- inputType속성값 (text, number, phone, textPassword 등)에 따라 디바이스의 입력 소프트키패드가 다른 UI모양으로 보여짐
지정이 없으면 엔터를 가진 키패드가 올라옴.(줄바꿈이 됨)- height값이 wrap이면 뷰가 커지고 수치값이면 안에 내용물이 안보이게 됨.
- 여러줄 입력 : inputType="textMultiLine" 및 ultiLine의 뷰 높이 관련속성 lines , maxLines
- EditText에 이미지 넣기 : drawableRight="@drawable/ic_favorite_black_40dp" ( 실습예제에 사용된 이미지는 AndroidStudio의 Image Asset메뉴를 통해 제작 )
- EditText 커서 안보이기 : cursorVisible="false"
- width를 글자수로 지정하기 : ems="5"
- background속성으로 배경을 지정하면 언더라인이 안보임. 즉, 언더라인이 EidText의 기본 배경이었던 것임
- EditText의 포커스 자동 이동 : Java 코드를 통한 커서 이동처리 필요함 (전화번호 입력폼에 유용한 기법)
- 기본적으로 화면에 EditText가 있으면 처을 실행할 때 자동으로 포커스를 가지게 됨. 이게 싫다면 ViewGroup(예제에서는 root의 LineaerLayout)에게 focusableInTouchMode="true"로 지정하면 EditText가 기본적으로 가지게 되는 Focus를 뺏어올 수 있음
- 소프트키패드 강제 보이기/숨기기/토글하기
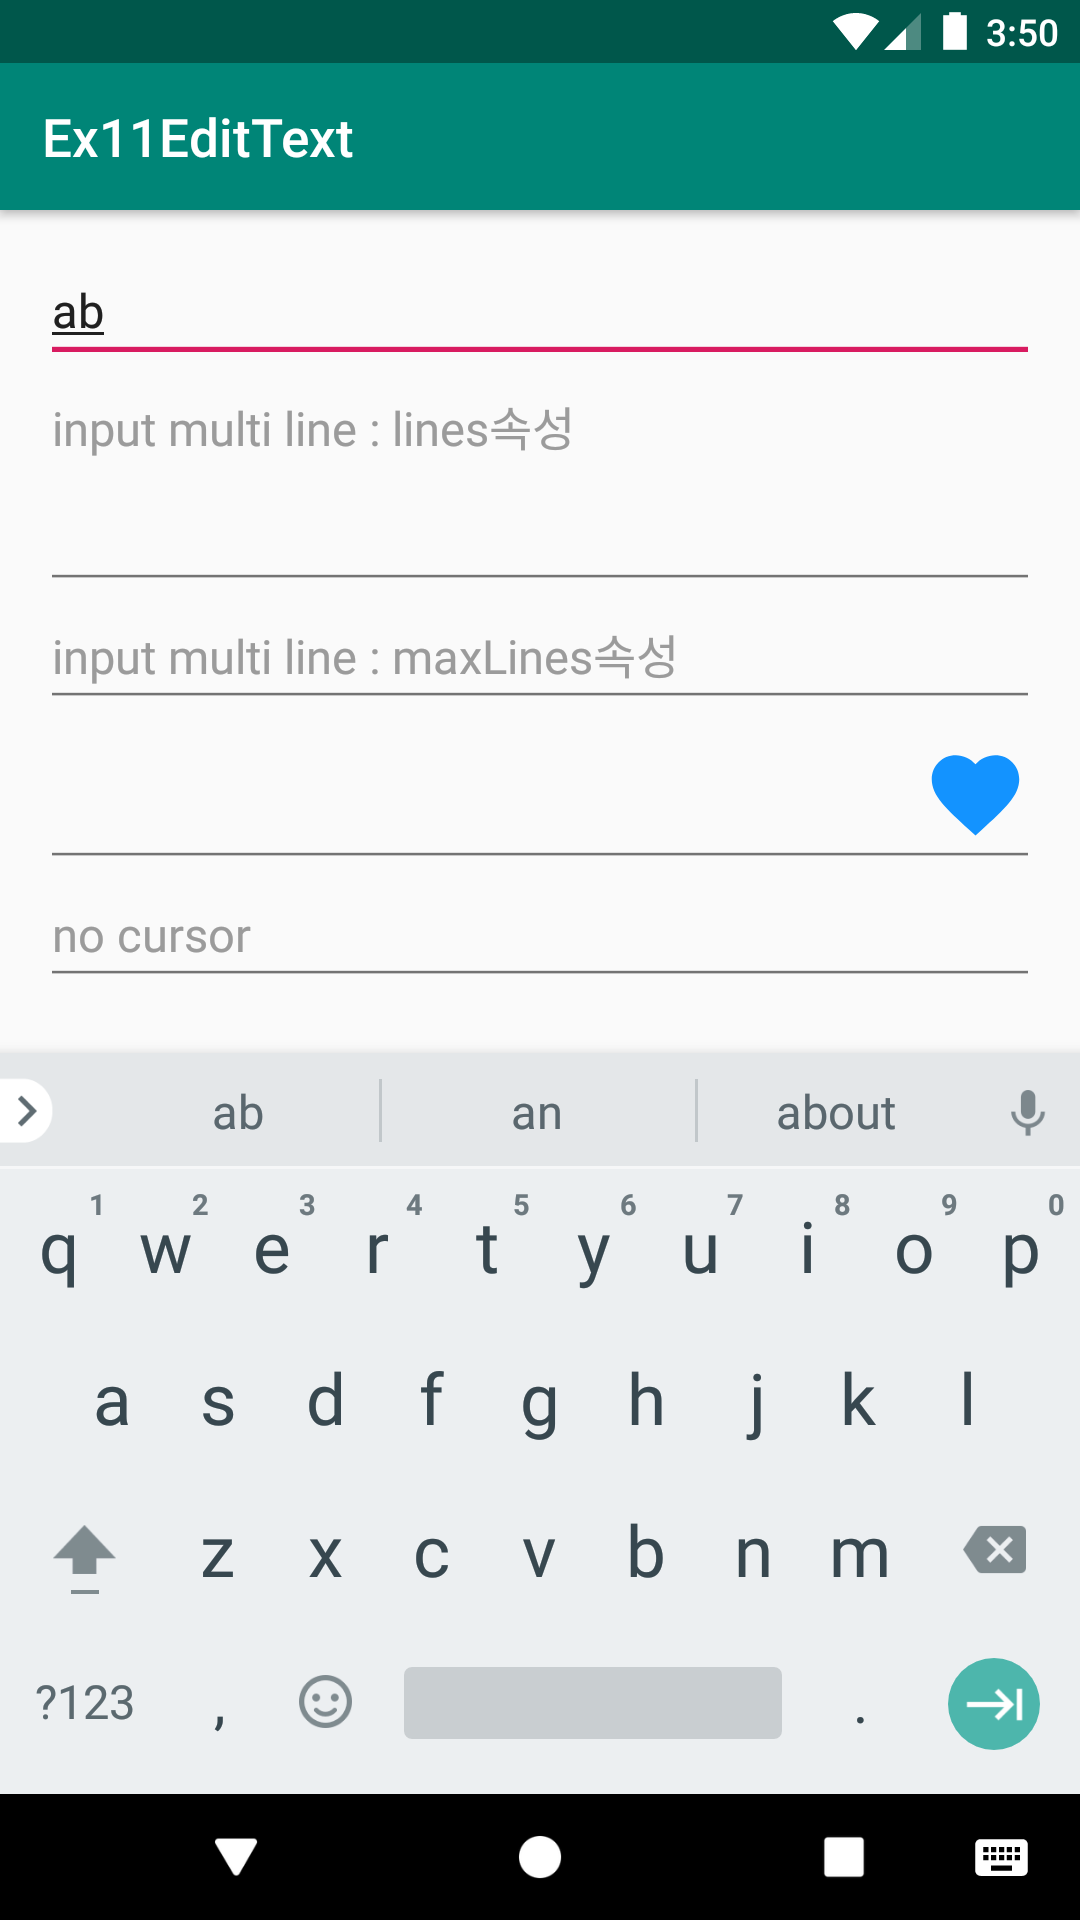
실행모습
inputType속성에 따라 다른 모양의 소프트키패드 [ text | number | phone | textPassword ]


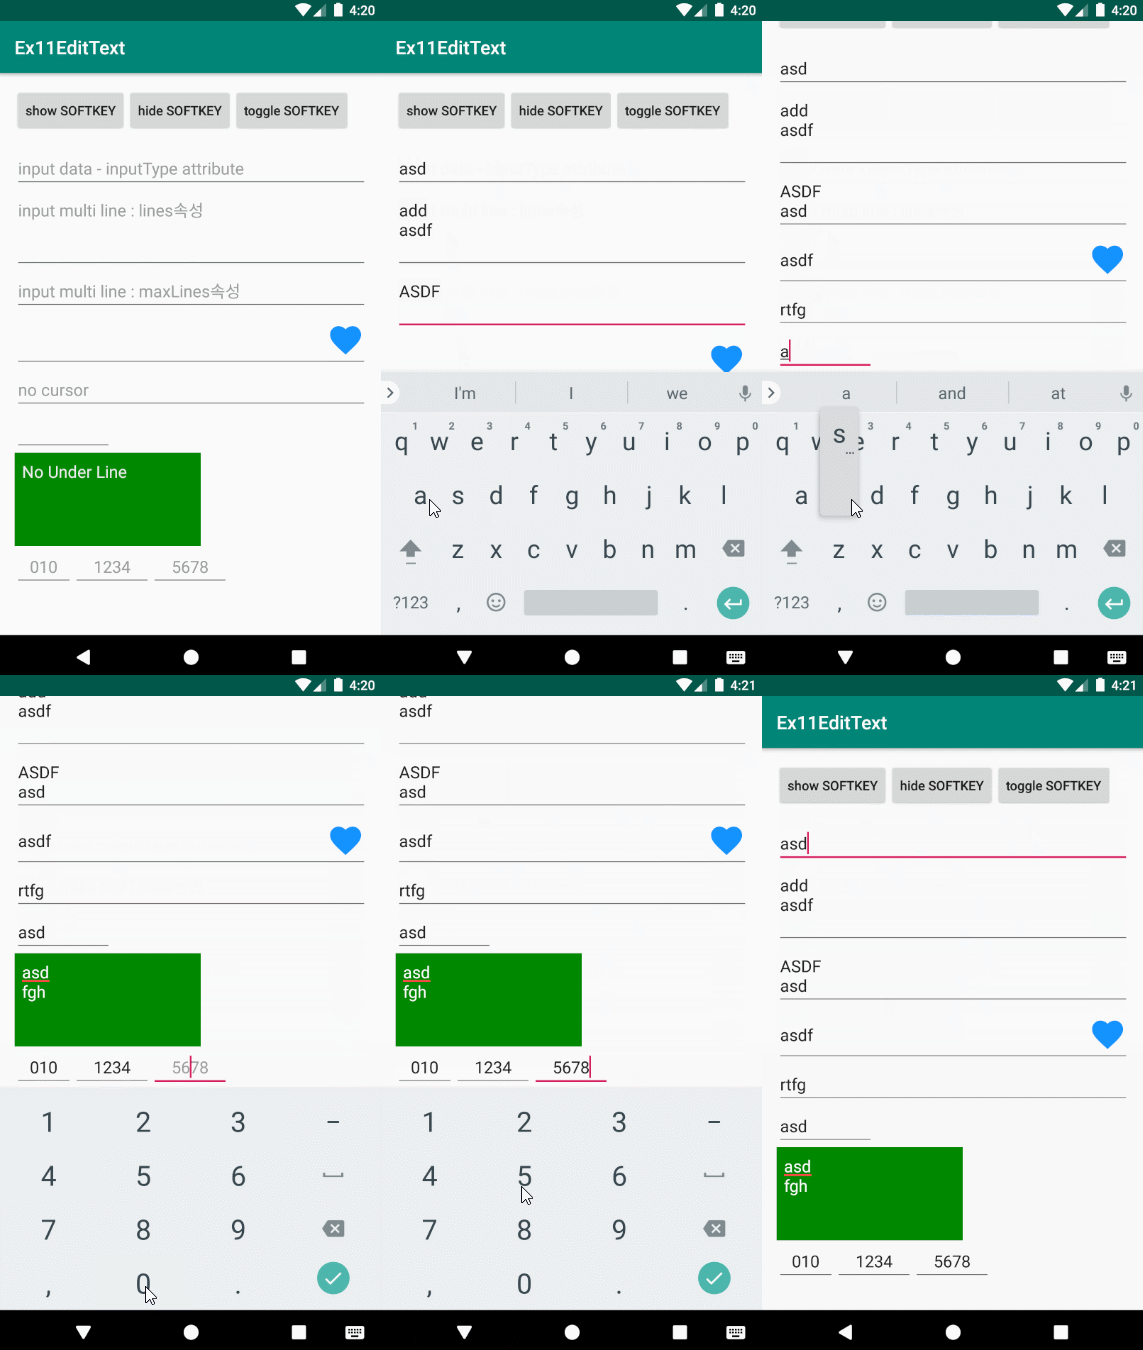
EditText의 기타 속성들에 따른 실행모습


실행모습 GIF

소스코드
| # activity_main.xml |
<?xml version="1.0" encoding="utf-8"?>
<LinearLayout xmlns:android="http://schemas.android.com/apk/res/android"
    xmlns:app="http://schemas.android.com/apk/res-auto"
    xmlns:tools="http://schemas.android.com/tools"
    android:layout_width="match_parent"
    android:layout_height="match_parent"
    android:orientation="vertical"
    android:padding="16dp"
    android:focusableInTouchMode="true"
    tools:context=".MainActivity">
    <!--focusableInTouchMode="true"로 하면 EditText가 기본적으로 가지게 되는 Focus를 뺏어올 수 있음-->

    <!--///////// 아래의 EditText실습이 모두 종료된 후 실습 /////////////////////-->
    <!--소프트키패드 강제 보이기/숨기기/토글하기-->
    <LinearLayout
        android:layout_width="match_parent"
        android:layout_height="wrap_content"
        android:orientation="horizontal"
        android:layout_marginBottom="16dp">

        <Button
            android:layout_width="wrap_content"
            android:layout_height="wrap_content"
            android:text="show SOFTKEY"
            android:textAllCaps="false"
            android:onClick="clickBtn"/>
        <Button
            android:layout_width="wrap_content"
            android:layout_height="wrap_content"
            android:text="hide SOFTKEY"
            android:textAllCaps="false"
            android:onClick="clickBtn2"/>
        <Button
            android:layout_width="wrap_content"
            android:layout_height="wrap_content"
            android:text="toggle SOFTKEY"
            android:textAllCaps="false"
            android:onClick="clickBtn3"/>
    </LinearLayout>
    <!-- ///////////////////////////////////////////////////////////////////////// -->

    <!--inputType속성 주요 설정값-->
    <!-- -지정이 없으면 엔터를 가진 키패드가 올라옴.(줄바꿈이 됨)- height값이 wrap이면 뷰가 커지고 수치값이면 안에 내용물이 안보이게 됨.-->
    <!-- -"date": 숫자 키패드(/, -, . 3개의 특수문자 키) - 줄바꿈 안됨.(포커스가 다음으로 이동됨)-->
    <!-- -"datetime": 숫자 키패드(/, -, . , :(롱클릭) 4개의 특수문자 키) - 줄바꿈 안됨.-->
    <!-- -"number":숫자 키패드 - 줄바꿈 안됨.-->
    <!-- -"numberSigned": 음수부호 입력 가능 - 줄바꿈 안됨.-->
    <!-- -"phone":다이얼 키패드 - 줄바꿈 안됨.-->
    <!-- -"text" : -줄바꿈 안됨-->
    <!-- -"textCapCharacters" : 모두 대문자 -줄바꿈 안됨-->
    <!-- -"textCapWords" : 단어의 첫글자에서 대문자 다음부터 자동 소문자(띄어쓰기 후 다시 대문자)-->
    <!-- -"textCapSentences " : 문자의 첫글자 대문자.-->
    <!-- -"textMultiLine" : 여러줄 입력 -엔터가 줄바꿈으로 됨.-->
    <!-- -"textPassword" : 입력된 글자가 가려짐 : 영어만 입력가능함 -->
    <EditText
        android:layout_width="match_parent"
        android:layout_height="wrap_content"
        android:hint="input data - inputType attribute"
        android:inputType="text"/>

    <!-- multiLine의 뷰 높이 관련 -->
    <!-- 라인수 관련(뷰의 높이사이즈 관련) 속성 -->
    <!-- lines : 처음 화면에 보이는 EditTest의 라인수 [ex. line=3 이면 3줄크기의 EditText 출력 - 단, 스크롤을 통해 여러줄 입력가능] -->
    <EditText
        android:layout_width="match_parent"
        android:layout_height="wrap_content"
        android:hint="input multi line : lines속성"
        android:inputType="textMultiLine"
        android:lines="3"
        android:gravity="top"/>

    <!-- maxLines : 처음 보일때는 한줄입력 EditText로 보여지다가 엔터를 통해 늘어날때 최대 3줄크기까지 늘어남. (스크롤을 통해 여러줄 입력은 여전히 가능함) -->
    <EditText
        android:layout_width="match_parent"
        android:layout_height="wrap_content"
        android:hint="input multi line : maxLines속성"
        android:inputType="textMultiLine"
        android:maxLines="3"/>

    <!-- 특정 줄 수 입력은 현재는 없으며 한줄만 입력가능하게 하는것은 inputType=text로 처리! [line속성은 무시됨] -->

    <!--EditText에 이미지 넣기-->
    <EditText
        android:layout_width="match_parent"
        android:layout_height="wrap_content"
        android:inputType="text"
        android:drawableRight="@drawable/ic_favorite_black_40dp"/>

    <!--EditText 커서 안보이기-->
    <EditText
        android:layout_width="match_parent"
        android:layout_height="wrap_content"
        android:hint="no cursor"
        android:cursorVisible="false"/>

    <!-- width를 글자수로 지정하기-->
    <EditText
        android:layout_width="wrap_content"
        android:layout_height="wrap_content"
        android:ems="5"/>

    <!-- 배경을 바꾸면 언더라인이 없어짐-->
    <EditText
        android:layout_width="200dp"
        android:layout_height="100dp"
        android:background="#008800"
        android:textColor="#FFFFFF"
        android:padding="8dp"
        android:gravity="top"
        android:hint="No Under Line"
        android:textColorHint="#EEEEEE"/>

    <!-- 전화번호 입력폼에 유용한 기법 -->
    <!--EditText의 포커스 자동 이동 : Java 코드를 통한 커서 이동처리 필요함. -->
    <LinearLayout
        android:layout_width="match_parent"
        android:layout_height="wrap_content"
        android:orientation="horizontal">

        <EditText
            android:id="@+id/edit01"
            android:layout_width="wrap_content"
            android:layout_height="wrap_content"
            android:ems="3"
            android:inputType="number"
            android:maxLength="3"
            android:hint="010"
            android:gravity="center"/>
        <EditText
            android:id="@+id/edit02"
            android:layout_width="wrap_content"
            android:layout_height="wrap_content"
            android:ems="4"
            android:maxLength="4"
            android:inputType="number"
            android:hint="1234"
            android:gravity="center"/>
        <EditText
            android:id="@+id/edit03"
            android:layout_width="wrap_content"
            android:layout_height="wrap_content"
            android:ems="4"
            android:maxLength="4"
            android:inputType="number"
            android:hint="5678"
            android:gravity="center"/>

    </LinearLayout>


</LinearLayout>
▶ @drawable/ic_favorite_black_40dp.xml 이미지 아이콘 파일은 AndroidStudio의 Vector Asset 메뉴를 통해 만든 이미지임.
| # MainActivity.java |
import android.support.v7.app.AppCompatActivity;
import android.os.Bundle;
import android.text.Editable;
import android.text.TextWatcher;
import android.view.View;
import android.view.inputmethod.InputMethodManager;
import android.widget.EditText;

public class MainActivity extends AppCompatActivity {

    EditText edit01, edit02, edit03;

    @Override
    protected void onCreate(Bundle savedInstanceState) {
        super.onCreate(savedInstanceState);
        setContentView(R.layout.activity_main);

        edit01= findViewById(R.id.edit01);
        edit02= findViewById(R.id.edit02);
        edit03= findViewById(R.id.edit03);

        //EditText의 글씨가 변경될때 마다 반응하기 - 텍스트변경리스터 TextChangedListener로서 TextWatcher객체를 전달
        edit01.addTextChangedListener(new TextWatcher() {

            //텍스트가 변경되기 이전에 자동 실행되는 메소드 - 변경 이전의 텍스트를 얻어올 때 활용가능
            @Override
            public void beforeTextChanged(CharSequence charSequence, int start, int count, int after) {

            }

            //텍스트가 변경되었을 때 자동 실행되는 메소드 - 변경된 텍스트를 얻어올 때 활용
            @Override
            public void onTextChanged(CharSequence charSequence, int start, int before, int count) {
                //첫번재 파라미터 charSequence : 현재 EditText에 써있는 글씨

                // 전화번호의 첫번째 자리는 010 처럼 3자리 이므로..
                //EditText에 작성된 글씨(String)의 길이(글자수)가 3가 이상인가? - 그럼 edit02객체가 포커스를 가지도록 요청
                if(charSequence.length()>=3){
                    edit02.requestFocus();//포커스 요청
                }
            }

            //텍스트변경 작업이 완료된 후 자동 실행되는 메소드
            @Override
            public void afterTextChanged(Editable editable) {

            }
        });

        // 위와 마찬가기로 전화번호의 2번째 자리도 4자리로 구성되어 있으므로 4글자 이상이면 마지막 edit03으로 포커스 이동시키는 코드
        edit02.addTextChangedListener(new TextWatcher() {
            @Override
            public void beforeTextChanged(CharSequence charSequence, int i, int i1, int i2) {

            }

            @Override
            public void onTextChanged(CharSequence charSequence, int i, int i1, int i2) {
                if(charSequence.length()>=4){ //입력된 글씨가 4글자 이상인가?
                    edit03.requestFocus();
                }
            }

            @Override
            public void afterTextChanged(Editable editable) {

            }
        });

    }//onCreat method....


    //소프트 키패드 보이기
    public void clickBtn(View view) {

        //소프트키패드를 관리하는 InputMethodManager객체를 시스템객체(Context)로 부터 얻어오기
        // 참고 : Context - 안드로이드 운영체제의 주요기능관리객체(시스템서비스객체)들을 가진 객체[일종의 운영체체 대리인 - 운영체제의 능력을 사용하고 싶을 때 호출]
        //                - InputMethodManager가 바로 주요기능 관리객체(시스템서비스객체)임.
        //                - Activity는 Context를 상속받아 만들어진 클래스 여서 Context의 능력을 그대로 사용할 수 있음.
        InputMethodManager imm= (InputMethodManager)getSystemService(INPUT_METHOD_SERVICE);

        //InputMethodManager객체에게 소프트 키패드를 보이도록 요청 - 파라미터로 전달된 값은 추후 소개
        imm.showSoftInput(getCurrentFocus(), 0);
    }

    //소프트 키패드 숨기기
    public void clickBtn2(View view){

        InputMethodManager imm= (InputMethodManager)getSystemService(INPUT_METHOD_SERVICE);

        //InputMethodManager객체에게 소프트 키패드를 숨기도록 요청 - 파라미터로 전달된 값은 추후 소개
        imm.hideSoftInputFromWindow(getCurrentFocus().getWindowToken(), 0);
    }

    //소프트 키패드 토글
    public void clickBtn3(View view) {

        InputMethodManager imm= (InputMethodManager)getSystemService(INPUT_METHOD_SERVICE);

        //InputMethodManager객체에게 소프트 키패드가 보이면 숨기고 안보이면 보이도록 요청 - 파라미터로 전달된 값은 추후 소개
        imm.toggleSoftInput(0, 0);
    }

}
※ 이 포스트의 코드는 수정예정임.
반응형
