
반응형
Ex08TableLayout
안드로이드 네이티브 앱 개발 수업 예제#8
주요코드
TableLayout 알아보기
TableLayout은 LineaerLayout을 상속하였기에 뷰들이 겹쳐질 수 없음 : 기본적으로 LinearLayout의 중첩구조를 위해 만들어진 Layout
- res폴더>>layout폴더안에 있는 activity_main.xml문서를 수정하여 화면제작
- TableLayout뷰는 LinearLayout의 vertical orientaion을 기반으로 만들어진 뷰
- TableRow뷰는 LinearLayout의 horizontal orientaion을 기반으로 만들어진 뷰
- TableLayout안에 TableRow로 한줄씩 배치하는 방식의 Layout
- 자식뷰들의 사이즈 지정(layout_widht, layout_height)이 명시적으로 없이도 기본 wrap_content로 지정되어 코딩이 간소화되는 이점이 있음
- TableLayout의 layout_column, layout_span, stretchColumns, shrinkColumns, collapseColumns속성들 적용하기
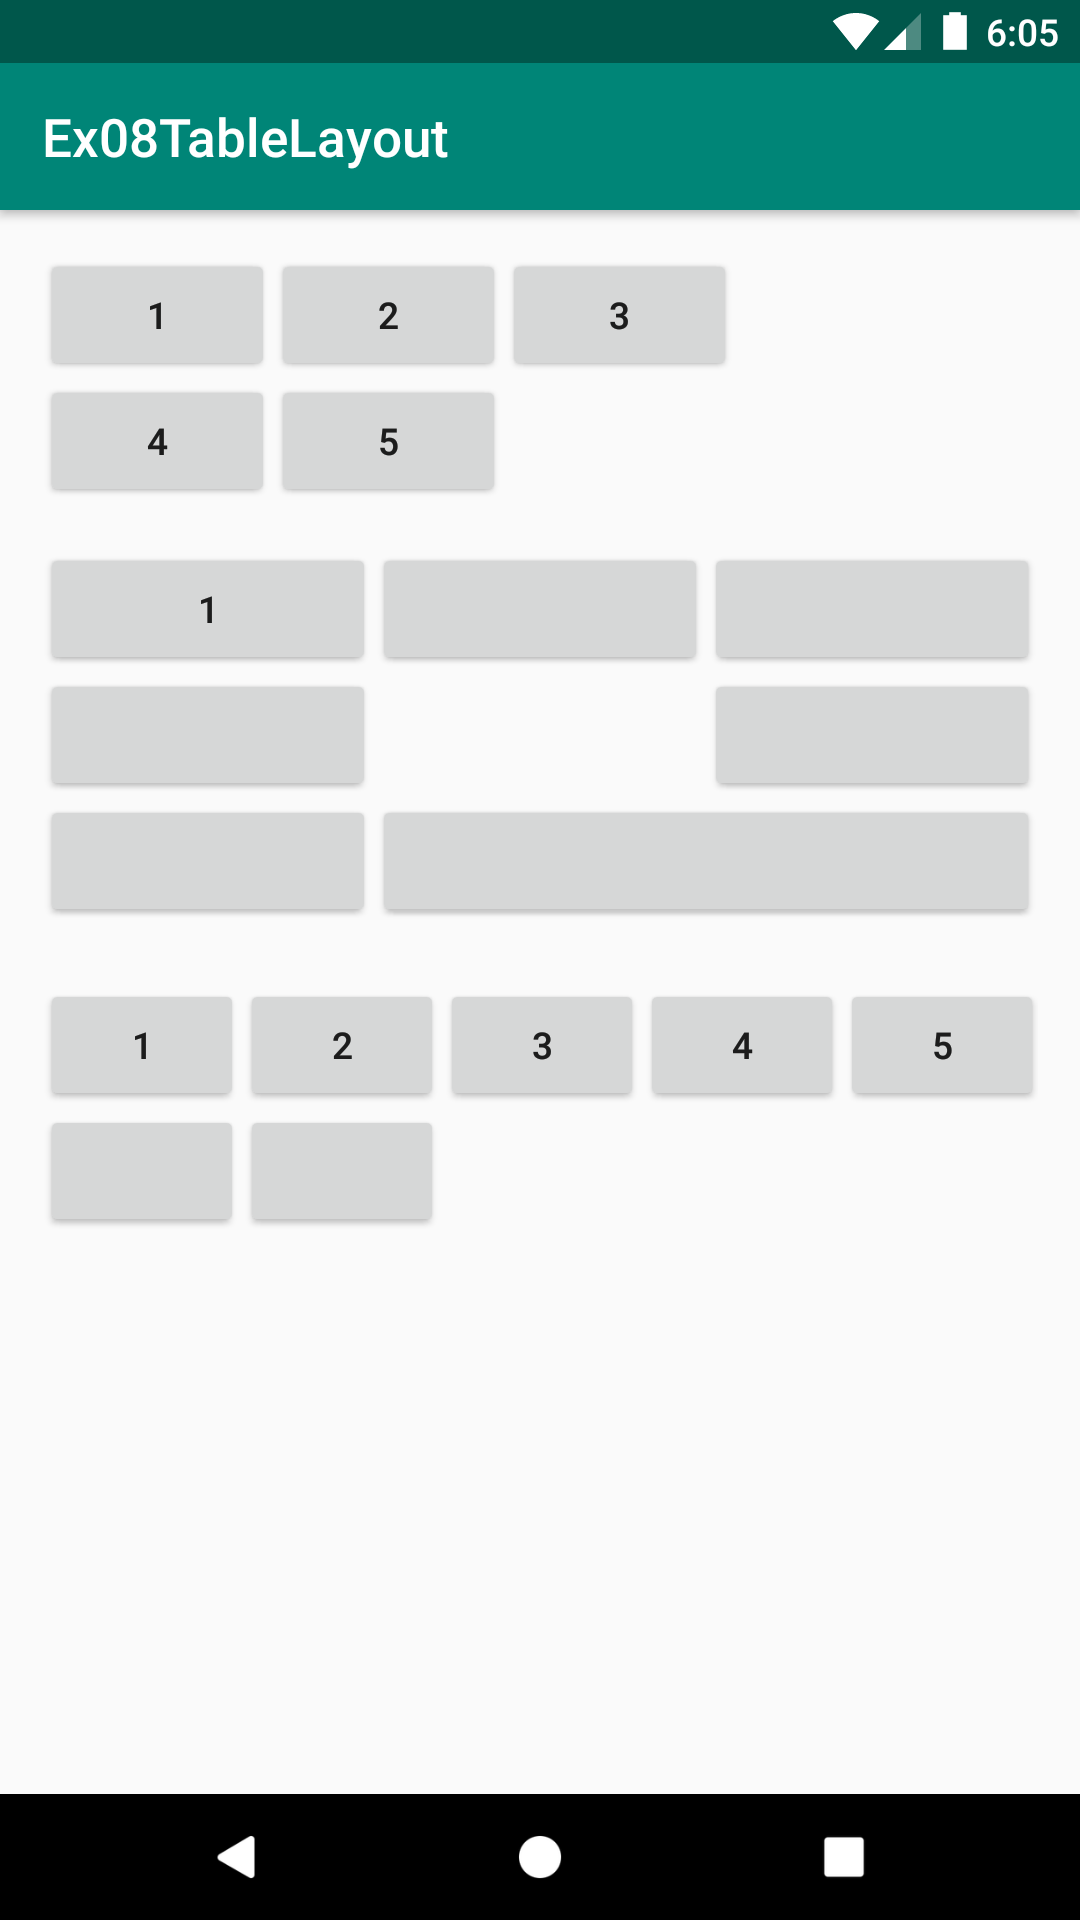
실행모습


소스코드
| # activity_main.xml |
<?xml version="1.0" encoding="utf-8"?>
<LinearLayout xmlns:android="http://schemas.android.com/apk/res/android"
    xmlns:app="http://schemas.android.com/apk/res-auto"
    xmlns:tools="http://schemas.android.com/tools"
    android:layout_width="match_parent"
    android:layout_height="match_parent"
    android:orientation="vertical"
    android:padding="16dp"
    tools:context=".MainActivity">

    <!--TableLayout은 기본적으로 LinearLayout을 상속받아 제작되었기에 뷰들이 겹칠 수 없음-->
    <TableLayout
        android:layout_width="match_parent"
        android:layout_height="wrap_content">

        <!--첫번째 줄 : 사이즈를 안줘도 기본 wrap_content -->
        <TableRow>
            <Button android:text="1"/>
            <Button android:text="2"/>
            <Button android:text="3"/>
        </TableRow>

        <!-- 두번째 줄 : 개수가 달라도 됨 -->
        <TableRow>
            <Button android:text="4"/>
            <Button android:text="5"/>
        </TableRow>

    </TableLayout>


    <!--기본 뷰들의 사이즈는 wrap_content이며 stretchColumns="1,2" 를 통해 widht 사이즈 늘리기 가능, *을 통해 균등배치도 가능-->
    <!--TableLayout안의 TableRow들은 서로의 칸(Column)수에 영향을 받음. 모두 같은 칸수를 가지게 됨-->
    <TableLayout
        android:layout_width="match_parent"
        android:layout_height="150dp"
        android:stretchColumns="*"
        android:layout_marginTop="16dp">

        <!--사이즈를 안줘도 기본 wrap_content -->
        <TableRow>
            <Button android:text="1"/>
            <Button />
            <Button />
        </TableRow>

        <!-- 원래 배치 순서를 바꿘 column번호 지정 가능-->
        <TableRow>
            <Button />
            <Button android:layout_column="2"/>
            <!--번호의 순서를 바꿔서 지정하는 것은 불가능-->
            <!--<Button android:layout_column="1"/>-->
        </TableRow>

        <!--셀병합( 칸합치기 )-->
        <TableRow>
            <Button />
            <Button android:layout_span="2"/>
        </TableRow>

    </TableLayout>


    <!--TableLayout의 가로 사이즈를 벋어나는 뷰들이 있을때 기본 wrap을 사용하면 화면에서 가려지므로 반대로 줄일 수 있음-->
    <!--shrinkColumns="1,2"를 통해 줄일 뷰를 지정하거나 *을 통해 균등하게 줄이는 것이 가능-->
    <TableLayout
        android:shrinkColumns="*"
        android:layout_marginTop="16dp"
        android:layout_width="match_parent"
        android:layout_height="wrap_content">

        <TableRow>
            <Button android:text="1"/>
            <Button android:text="2"/>
            <Button android:text="3"/>
            <Button android:text="4"/>
            <Button android:text="5"/>
        </TableRow>

        <TableRow>
            <Button />
            <Button />
        </TableRow>

    </TableLayout>


    <!-- 셀숨기기 : collapseColumns="1"을 통해 칸 숨기기 가능-->
    <TableLayout
        android:collapseColumns=""
        android:layout_marginTop="16dp"
        android:layout_width="match_parent"
        android:layout_height="wrap_content">

        <!--이렇게 TableRow가 아닌 것이 하나의 Row를 차지하는 것도 가능함 -->
        <Button />

        <!--개별셀(뷰)들에게 사이즈 지정 가능 : 그 Row의 다른 칸들의 배치에도 영향을 줌-->
        <TableRow>
            <Button />
            <Button android:layout_width="150dp"/>
        </TableRow>

        <TableRow>
            <Button />
            <Button android:layout_height="80dp"/>
        </TableRow>

    </TableLayout>

</LinearLayout>
반응형